As mentioned in My Web Design Resources post, I’m using EasyPHP to test my php driven website to work under Windows. And I’m referring to my pages outside this blog.
If I have to test a plugin or if I have to view other themes on this blog, I have to get online to see how it works. I don’t want to go online all the time to test something because I’m afraid I might risk my online blog if something went wrong. Since I already have EasyPHP installed, I thought that maybe I could also install WordPress locally for my test blog. I already have a local copy of my WP folder and database like what I told you in my Upgrading to WordPress 2.1.3 post.
I googled on how to install WordPress locally, and I came across Geeks are Sexy‘s very nice and detailed tutorial on Installing WordPress Locally Under Windows XP. She’s using XAMPP lite for Windows while I’m using EasyPHP. Podz’ also has a very useful post on Moving your WordPress weblog inside your PC. Their posts were a big help for me to get started, so thanks to them! 🙂
So for those who also want to use EasyPHP, here’s my guide on Installing WordPress Locally Using EasyPHP.
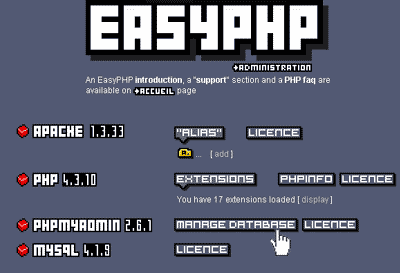
1. Download and install EasyPHP, if you haven’t done so. 🙂 EasyPHP is a complete software package which includes Apache, MySQL and PHP. Unless you change the install location, it will be installed in C:\Program Files\EasyPHP1-8. Mine is installed that way. EasyPHP1-8 have Apache 1.3.33, PHP 4.3.10, phpMyAdmin 2.6.1 and MySQL 4.1.9 versions.
3. Create a new folder in C:\Program Files\EasyPHP1-8\www and name it wordpress. This will be your local WordPress folder.
2. Connect to your server and download the entire copy of your WP folder to your local WP folder. You may use any FTP you prefer, I’m using FileZilla. You want to have a local version of your blog, that’s why you have to download everything from your WP folder in your server.
3. Download a copy of your WP database, either by using PhpMyAdmin in your Cpanel or WordPress Database Backup Plugin. Let’s assume that WP database is wordpress.sql.
4. Open EasyPHP, and you will see an ‘e’ icon on the system tray. Right click that icon and select Administration. Now click Manage Database and you will be directed to phpMyAdmin page.

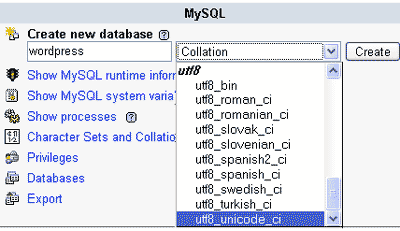
5. Create new database and name it wordpress or any name you want. I’m using wordpress for this example. Select utf8_unicode_ci in the drop down box in the next field and press Create button.

6. Open wp-config-sample.php using Notepad or your preferred text editor and replace the default values as stated in the instruction below:
// ** MySQL settings ** //
define('DB_NAME', 'wordpress');// The name of the database (in the example above our DB is also ‘wordpress’ so no need to change it. )
define('DB_USER', 'username');// Your MySQL username (change the username to ‘root’)
define('DB_PASSWORD', '');// …and password (leave it blank or empty for user ‘root’)
define('DB_HOST', 'localhost');// 99% chance you won’t need to change this value
7. Save this file as wp-config.php. Your wp-config.php file must have all the correct details about your database or else you will not be able to access your blog locally.
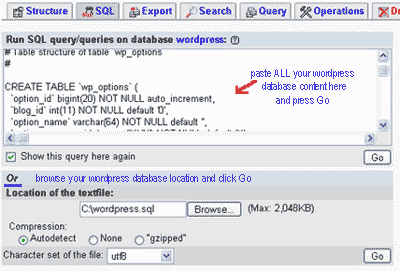
8. Import your local copy of your WP database by clicking the SQL tab in the phpMyAdmin page. Open the .sql file (wordpress.sql) in your text editor, select all, then copy and paste the content into Run SQL query/queries on database wordpress: and click Go.
Or for the simplest way, browse the location of your .sql file on your computer and upload it.

If importing was successful, you will see a message similar to this:
Your SQL-query has been executed successfully:
The content of your file has been inserted. (: 232 Instructions)
9. Update your WP web address inside table wp-options, change it to which is your local address.
To do that, copy-paste the following in the Run SQL query/queries on database wordpress and press Go.
UPDATE `wp_options`

SET `option_value` = "http://127.0.0.1/wordpress"

WHERE `option_name` = "siteurl" OR
`option_name` = "home"
10. View your blog. Using your browser, go to . If you did all the steps as instructed above, you should be able to view your blog successfully.
Note: Remember that your password when you login to your local blog is still the same password that you use in your online blog since your password is saved in the database. You have the option to change it by editing Your Profile in the WordPress Admin Panel.
I was able to install and view my local blog successfully, didn’t have any problem until I found out that my current permalink structure which is /%postname%.php doesn’t work in my test version.
I can view the blog index but whenever I view a single post, or the archives, I am having a 404 error. I tried changing the structure but am still having an error, until I used the default permalink structure which is . Everything went smoothly then.
If you’re also having problem viewing single post, try using the default permalink too. And if you have other permalink structure that works locally, please share it with us.
That’s all for now. Hope you were able to install your local blog successfully! Happy installing! 🙂


 Benefits of Local WordPress Install
 Move WordPress Comment to Another Post
wow amor, elibs na tlaga ako sayo,, isa ka sa mga idol ko na geek girls (like kutitots.com), sa larangan ng web!
isa kang alamat! actually ni add ko nga tong post n2 in my del.icio.us acct, good job sis!
Na-aliw naman ako sa comment mong alamat Teks Adik! 😀
Geek? Grabee, hindi nman masyado. 😛 Pero si kutitots magaling tlaga sya, I also like her style.
Thanks a lot! 🙂
Pingback: Busy with WordPress » Amor’s Blog
Pingback: Between Your Legs » Amor’s Blog
Pingback: Sidebar Display Problem » Amor’s Blog
Pingback: Customizing WordPress 2.5 Login Screen » Amor’s Blog
Pingback: Benefits of Local WordPress Install » Amor’s Blog
finally i found what i'm looking for.
will try it!
Try it and see for yourself. EasyPHP is much better now compared to the time I posted this. They now support modules (WordPress, Drupal, Joomla, etc ) and it says, there's nothing to configure.
here is solution of different permalink style 😉
http://www.lancelhoff.com/how-to-make-wordpress-permalinks-work-in-xampp/
thanks for sharing. You made some good points there. its easy to learn.
your website is great. a lot information can i get from here 🙂